
 # The DIY Blueprint: Your Guide to Installing a Floating Shelf
Floating shelves are an excellent way to add both functional storage and aesthetic appeal to your home. Whether you’re looking to display family photos or store books, a floating shelf can provide a minimalist look without the bulk of traditional shelving. In this guide, we’ll walk you through the process of installing a floating shelf while emphasizing safety, precision, and technique.
## Tools and Materials Needed
Before we dive into the installation process, ensure you have the following tools and materials:
### Tools:
– **Stud finder**: Essential for locating wall studs, which provide the necessary support for your shelf.
– **Level**: To ensure your shelf is straight.
– **Drill**: A power drill with drill bits suitable for your wall type (e.g., masonry bit for concrete, regular bit for drywall).
– **Screwdriver**: To tighten screws.
– **Tape measure**: For accurate measurements.
– **Pencil**: To mark measurements on the wall.
– **Safety goggles**: Always wear these when drilling to protect your eyes from debris.
– **Hearing protection**: Optional, but recommended.
### Materials:
– **Floating shelf**: Choose the size and material that suits your project.
– **Shelf brackets**: Depending on your shelf design, you may need hidden brackets or specific mounting hardware.
– **Screws**: Match the screws to your brackets and wall type.
– **Wall anchors**: Use these if you are not drilling into a stud.
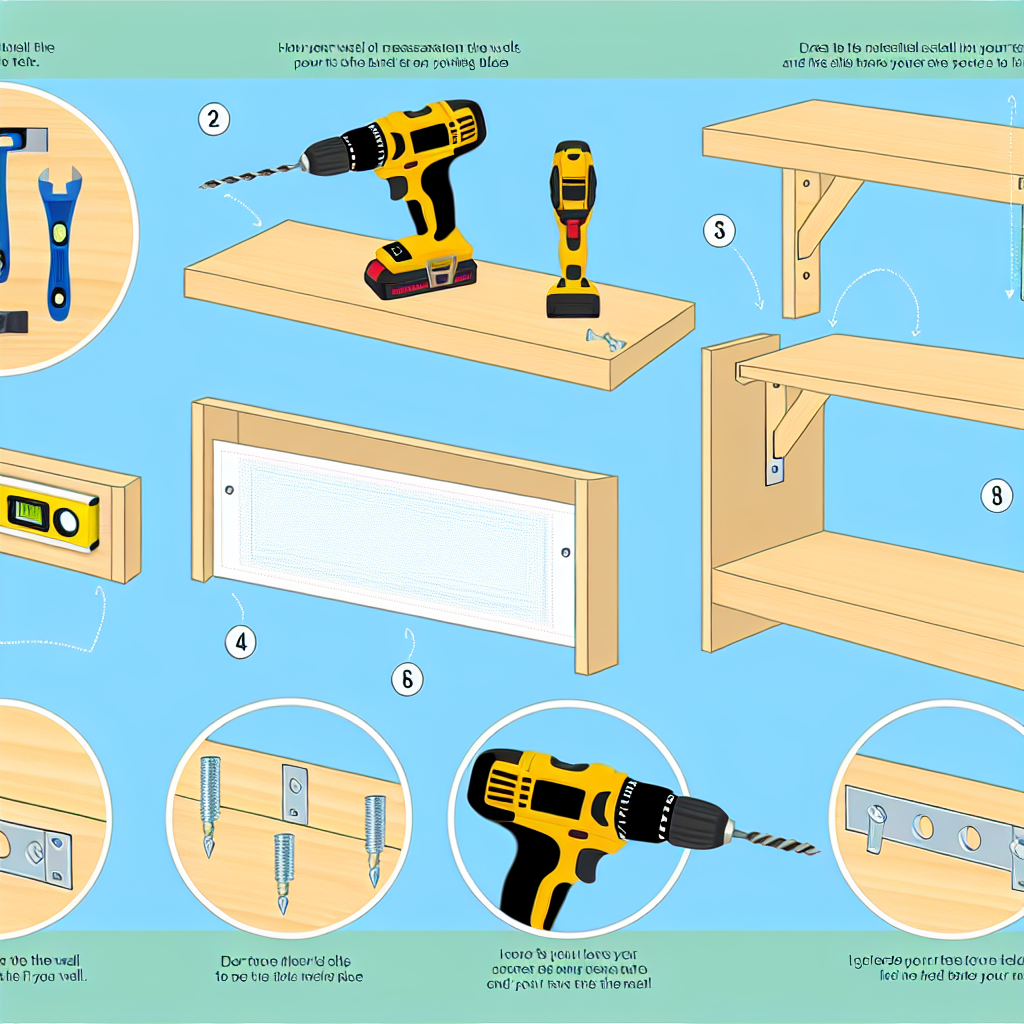
## Step-by-Step Installation Instructions
Here’s how to install your floating shelf:
### Step 1: Choose the Right Location
Identify where you want your shelf to go. Take into account surrounding decor to ensure it fits aesthetically.
### Step 2: Locate the Studs
Use a stud finder to locate the wall studs in the area where you plan to install the shelf. Mark these stud locations lightly with a pencil. If you cannot find studs, be prepared to use wall anchors to securely mount brackets.
### Step 3: Measure and Mark
Decide on the height at which you want to install your shelf, and use your level to draw a straight line across the wall at that height. Then, measure the length of your shelf and mark the locations for mounting brackets according to the bracket kits’ instructions.
### Step 4: Drill Pilot Holes
Using your drill, create pilot holes where you marked for the brackets. If drilling into studs, make sure your drill bit is appropriate for the wall type. Pilot holes help reduce the chance of the wall cracking and provide a guide for screw insertion.
### Step 5: Install Brackets
If you’re using wall anchors, insert them into the pilot holes according to package directions. Then, using your screwdriver or drill, secure the brackets to the wall, ensuring they are level as you go. Check with a level before tightening all screws to ensure everything is straight.
### Step 6: Attach the Shelf
With the brackets securely mounted, gently slide the floating shelf onto the brackets. Most floating shelves will click or fit snugly into place. Make sure to double-check with your level that it’s properly aligned before you step back.
### Step 7: Safety Check
Once installed, gently test the weight capacity of the shelf by applying light pressure or setting a small item on it. This helps confirm the stability of your installation.
## Common Mistakes to Avoid
1. **Not using a stud finder**: Mounting shelves solely on drywall can lead to sagging or falling shelves. Always anchor to studs when possible.
2. **Skipping pilot holes**: Drilling directly into the wall without pilot holes can cause damage and misalignments.
3. **Neglecting to level**: Failing to check for level as you move can result in a crooked shelf, which is not only unattractive but can also lead to items sliding off.
4. **Overloading**: Each shelf has a weight limit. Read your shelf’s specifications to avoid overloading it.
## Pro Tips from the Pros
– **Plan Ahead**: Plan ahead for the items you want to display and consider their weight when selecting shelves and brackets.
– **Use Quality Materials**: Use high-quality mounting hardware for durability and safety.
– **Take Your Time**: Don’t rush the process. Accuracy and safety should always come first.
## Empowering Conclusion
Installing a floating shelf can be a rewarding project that enhances your living space. By following these steps carefully, you can ensure a safe and sturdy installation. Remember, it’s always better to start slow, prioritize your safety, and complete the job correctly than to rush through it and risk errors. Are you ready to tackle your own floating shelf project, or do you need more practice with your tools before diving in?
Leave a Reply